Tackle Drills
Author: Coach Kyle | Created: June 03, 2025
Tackling must be taught with an emphasis on safety, technique, and control. This page is organized around the USA Football tackling system — a structured progression that takes players from basic stance and positioning through game-speed competitive drills. Work through each phase in order before moving to the next.
USA Football Tackling System
Work through each phase in order. Players earn the right to advance by demonstrating proper form at every stage before contact is added.
Foundation Skills
Stance, positioning, and approach — no contact
Breakdown Position
Establish the athletic base position all tackling mechanics build from. Every drill starts here.
Key Coaching Points
- Feet shoulder-width apart, balanced weight
- Squeeze shoulder blades together
- Sink at the knees and waist — not just the knees
- Hands up and ready for uppercut motion
Near Foot Position
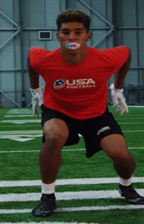
Train players to always lead with the correct foot. The near foot (the foot closest to the ball carrier) is the foundation of proper leverage at contact.
Key Coaching Points
- Near foot = the foot closest to the ball carrier
- Explode into near foot stance on command
- Wrong foot lead removes leverage at contact
- Practice until the correct lead becomes automatic
Near Foot / Near Shoulder
Pair foot position with shoulder position to establish the full contact framework. Two players mirror each other to train the pairing without live contact.
Key Coaching Points
- Near foot leads, near shoulder initiates contact
- Two players stand 5 yards apart and close on command
- Tackler touches with near-shoulder-side hand
- Eyes up through the close — no ducking
Near Hip Tracking

Train the eyes to lock onto the runner's near hip — the key to maintaining leverage and avoiding fakes. Hip tracking eliminates false-step reactions to juke moves.
Key Coaching Points
- Eyes locked on the ball carrier's near hip, not the ball
- Hip tracking eliminates reactions to head or shoulder fakes
- Maintain correct foot lead while tracking through cones
- Cone layout guides the approach angle
Run & Gather
Combine running toward a ball carrier with the breakdown position — transitioning from pursuit to contact-ready posture. The "gather" is the controlled deceleration and sink before contact.
Key Coaching Points
- Run at the ball carrier under control — not a sprint
- Gather: sink hips and widen base as you close
- Mirror the ball carrier's lateral movement
- Freeze in breakdown position — don't pop up through the gather
Contact Mechanics
Approach, explosion, and arm action — still no live contact
Swoop
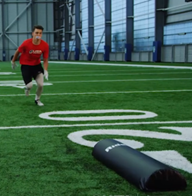
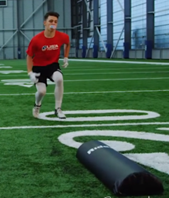
Teach the approach angle and the controlled freeze before contact. The swoop is the bridge between pursuit and the actual tackle — everything in the drive progression launches from this position.
Key Coaching Points
- Approach with the near foot leading
- At the end of the bag, freeze in full breakdown position
- Leverage angle comes from the approach, not the contact
- Coaching cue: "Swoop and freeze" — don't fall through the bag
Shoot
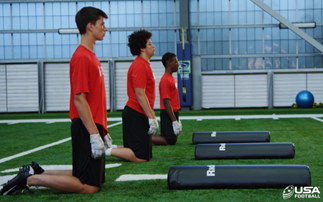
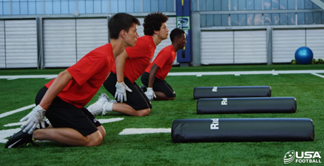
Train the explosive forward drive that initiates contact. Sinking and shooting forward happen simultaneously — this is the power phase of the tackle.
Key Coaching Points
- Sink at the waist — not just the knees
- Shoot forward as you sink — both movements are simultaneous
- Drive for 5 yards — not a one-step pop
- Keep cleats in the grass throughout the drive
- Head up, eyes on target the entire time
Upper Cuts
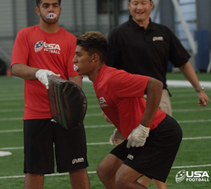
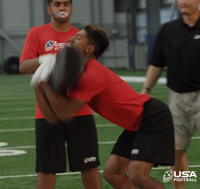
Develop the arm action that secures the ball carrier and powers the drive. Upper cuts create the wrap and the upward driving force simultaneously.
Key Coaching Points
- Start with near hip / near shoulder alignment
- Drive both arms in an uppercut motion through the target
- Contact is made with the near shoulder — head goes to the side
- Drive with the same leg that leads the contact
- Can be practiced with an exercise ball to vary angles
Drive Progression
Kneeling → Standing → Two-Step → Running — earn pads at each stage
Kneeling Drive Phase
Isolate the hip explosion and arm action from footwork. Starting on one knee removes all stride variables so players focus purely on the contact sequence.
Key Coaching Points
- Drill 1: Basic kneeling drive — pure explosion into the bag
- Drill 2: Add a roll before the drive for dynamic entry
- Drill 3: Full kneeling roll progression
- Drill 4: Same as Drill 3, now with pads
- Rule: earn pads only after confirming form without them
Kneeling vs. Player
Transfer the kneeling drive to live contact with a partner. This is the first time a real person receives the contact — technique must be confirmed on the bag before reaching this step.
Key Coaching Points
- Both players start in kneeling positions
- Partner provides resistance, not aggression
- All form points from bag work must carry over
- Coaches confirm leverage, head position, and wrap before adding speed
Standing Drive Phase
Add the standing start position. Players must now manage balance and leverage from an upright stance before moving — a more game-realistic starting point.
Key Coaching Points
- Drills 1–3: Standing drive → full progression → add pads
- Drills 4–5: Roll to standing entry — simulates recovering mid-play
- Confirm technique with each new variable before adding the next
- Roll entry develops balance and reactive body control
Standing vs. Player
Apply the standing drive with roll entry to live partner contact. Combines dynamic body positioning with real resistance — the most complex vs-player drill so far.
Key Coaching Points
- Player rolls, rises to standing, then drives into partner
- Maintain leverage through the entire sequence
- Head position and eye contact with the target throughout
- Partner provides controlled resistance — build intensity gradually
Two-Step Drive Phase
Introduce footwork with a two-step approach before contact. Players must now coordinate foot position with their contact sequence — bridging isolated drive work and full-speed running.
Key Coaching Points
- Rhythm: step, step — then shoot/drive into contact
- Near foot must lead on the second step
- Drill 2: roll entry + two-step + pads — highest complexity at this stage
- Form must hold with the added footwork before adding speed
Running Drive Phase
Apply all contact mechanics at full running speed. This is the final stage of the drive progression — players must demonstrate every form point under full movement before earning pads at this level.
Key Coaching Points
- Drills 1–2: Full running approach, two reps to confirm consistency
- Drill 3: Running roll entry with pads — highest intensity variation
- Form must not break at speed: near foot, near shoulder, upper cuts
- Do not add pads until Drills 1–2 are clean
Competitive Application
Game-speed drills that apply the full progression to realistic scenarios
Pop-Up Tackle
Build explosive reactivity from the ground up. Simulates recovering from a block or fall and immediately needing to make a tackle — a common game scenario.
Key Coaching Points
- Explosive movement up from the ground on command
- Immediately into breakdown/tackle position — no hesitation
- React and move — don't think, just execute
- Reinforces low pad level at the moment of contact
Two-Man Tackling Drills
Add timing and partner coordination at competitive speed. The rabbit variation challenges defenders to track a moving target — the most game-realistic scenario in the progression.
Key Coaching Points
- Drills 1–2: Coordinated pursuit and contact timing with a partner
- Drill 3 (Rabbit): Defender tracks a moving target — must anticipate, not react
- Maintain near-foot lead while in pursuit at full speed
- Every form principle from the progression must still apply
Angle Tackle
Practice form tackling when the ball carrier is moving laterally at a moderate angle. Approach angle becomes the critical variable — a pursuit angle that's too wide misses the tackle; too tight creates a glancing hit.
Key Coaching Points
- Cut the angle — don't trail from behind
- Maintain leverage through a lateral approach
- Near-foot alignment applies at every angle
- Drive through the contact — not sideways into it
Sprint Tackle
Execute the full tackling form at maximum speed. Tests whether form has been internalized well enough to hold under sprint conditions — the real benchmark of the entire progression.
Key Coaching Points
- Full-speed approach — no reduction in form under speed
- Gather and sink on the way in — don't stand up approaching contact
- Bag carrier sprints to create a realistic pursuit scenario
- Every key point from the full progression must still apply here
Tight Angle Tackle
Execute form tackling at a sharp cutback angle — the most leverage-demanding scenario a defender encounters. A tight angle is where fundamentals break down fastest if form hasn't been internalized.
Key Coaching Points
- Close distance quickly to cut off the cutback path
- Hips and feet must beat the cut — don't get caught leaning
- Near-shoulder lead is even more important at tight angles
- Stay square on approach to handle either direction
Form Tackle Checklist
You've just worked through the full mechanics progression above. This is the shorthand version — the cue sequence to call out on the field once the mechanics are internalized. It's not a drill itself; it's the checklist behind every drill you just ran.
- Run
- Swoop
- Upper Cuts
- Drive for Five
- Head Up for Vision
Supplemental Tackling Drills
Supporting drills and coaching methodologies that reinforce the progression — including tackle tube work and contact-reduction approaches.
Low Impact Tackling
A controlled-contact methodology that builds proper technique without high-velocity collisions. Ideal for early-season installation or teaching new players the form before adding full contact.
Leverage Step and Drive
Take 2–3 steps before landing on the tube. Emphasizes near foot/shoulder lead. Tackle tube provides resistance without a live partner.
Tackle Tube: Cornerback / Safety
Half-field tackling drill for secondary players using the tackle tube. Simulates open-field pursuit angles that DBs face on every passing play.
Linebacker Fill Drill
Simulate OL gaps with a tackle tube. The LB must scan the gap before attacking the rolled tube. Shoulder lead depends on the runner's direction — a great reads-and-reacts drill.
LB 7 Cone Tackling Drill
ASU LB Coach AJ Cooper's seven-cone drill for open-field tackling. The defender closes distance to take away space, stays inside-out on the ball carrier to control direction, and tracks the near hip/near number before finishing with the same foot and same shoulder. Add agility bags or crash mats as players progress to simulate screens, bubbles, and stretch plays.
How to Open Field Tackle
A quick coaching tip on closing space and finishing the tackle once the ball carrier is in the open field — a natural companion to the LB 7 Cone Drill above.
Never Miss a Tackle in This Drill Again
A short, repeatable drill built to clean up missed-tackle habits. Useful as a quick warm-up rep before full-speed competitive work.
How to Stop Missing Tackles
A quick technique cue for players who consistently miss or whiff on tackle attempts — good reinforcement alongside the Near Hip Tracking and Upper Cuts fundamentals in the progression above.
Football Drills Book — Tackling Drill Library
A broader library of tackling and pursuit drills — Oklahoma Drill, Chase Down Drill, Gap Attack, and more — covering leverage, angles, and situational tackling. A good reference once your players have the fundamentals above locked in.
Additional Resources
Cross-sport references and coaching enrichment material that reinforce the principles behind the USA Football tackling system.
All Blacks Rugby — Tackle Form
An excellent cross-sport example of safe and effective tackling mechanics at the highest level. Rugby players use the same fundamental principles: low pad level, head to the side, drive through contact. Worth showing players to illustrate that these techniques are universal — not just football-specific.
6 Tackling Drills to Create a Tenacious Defense
A Glazier Clinics roundup of six tackling drills for building a physical, disciplined defense — a solid supplement to the USA Football progression above.
The Best Tackling Circuit for High School Football
A fast-paced tackling circuit from Use My Elite Drills, built to chain multiple tackling reps together for explosiveness and conditioning at practice.
Become the Best Defensive End With This Tip
A quick edge-rusher technique tip from Coach Isaac Hadac. Most relevant for teams looking to sharpen tackling and finishing technique specifically at the defensive end position.
vIQtory Sports — Low Impact Tackling Drills
These low-impact tackling drills are excellent for teaching leverage, body positioning, tracking, footwork, and tackling mechanics while reducing unnecessary contact during practice. They're especially valuable for youth and high school coaches looking to increase repetitions while emphasizing player safety.
Low Impact Tackling Drills for Youth and High School Coaches
This is the full walkthrough from vIQtory Sports — watch it first to learn the coaching points behind each drill. The short clips below are quick-reference cuts from the drills demonstrated in this video, not separate resources.
Quick Reference: Drills From This Video
Already watched the full video above? Use these short looping clips at practice to quickly recall what a specific drill looks like — no need to scrub through the full video to find it.